Set Up Kubernetes Cluster Playground With Azure Virtual Machines and CLI
I’m going to write some blog posts about my Kubernetes adventures, and the first thing I wanted to do, was to set up some scripts to build up a simple Kubernetes environment to play with. I will of course also play around with Azure Kubernetes Service (AKS), but I also want to run some experiments with control plane. This means I need to build my own cluster, as control plane in AKS is provided as a managed Azure service.
I’m going to use Azure Cloud Shell for provisioning the resources and storing needed files. I will be using SSH keys to access the VMs. If you don’t already have one, or want to create new pair, you can create them by running ssh-keygen in Cloud Shell.
ssh-keygen -t rsa -b 4096
When prompted, accepted the default location for private (id_rsa) and public (id_rsa.pub) key files. These two files will be created in ~/.ssh directory. Note Files are overwritten if they already exist.
As a best practise you should protect your private key with a passphrase. If an attacker gets hold of your private key without a passphrase, the private key can be used to log in to any servers having the corresponding public key. If the private key is protected by a passphrase, it cannot be used without the passphrase.
Architecture
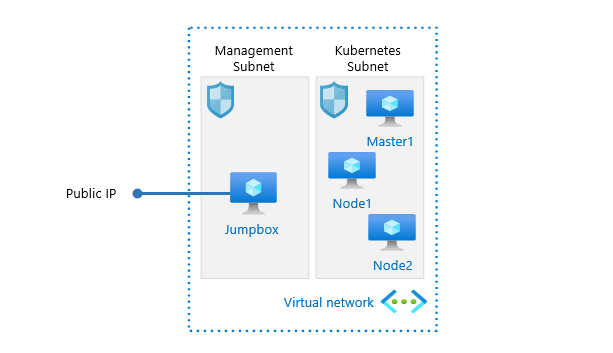
I have already provisioned a virtual network with two subnets in it. Network security groups have been associated to the subnets. Management subnet is reserved for a jumpbox I will be using to connect the VMs in the cluster, other subnet is reserved for Kubernetes virtual machines. I have also already provisioned a Jumpbox VM and I have copied the previously created private SSH key in it. Jumpbox and network resources reside in separate resource groups, and cluster resources will be provisioned to a separate resource group. This makes it possible to remove cluster resources by removing the resource group. You can see the simplified architecture of the cluster, which includes one master and two nodes, in the picture below.
Creating resources
I’m using few variables in the script for values, which will be used more than once: name of the resource group, location, admin username, VM size, and names of existing vnet and subnet to get a reference to resourceid of used subnet. Note I have my SSH public key file and initialization scripts in the same folder from where I run these commands. I’ll introduce the contents of the scripts a bit later. You can find the script files from my GitHub repo.
RESOURCEGROUP=rg-kubernetes-test
LOCATION=westeurope
ADMINUSER=azureuser
VM_SIZE=Standard_D2_v3
VNET_RG=rg-networking
VNET=vnet-test
SUBNETNAME=kubernetes-subnet
SUBNETID=$(az network vnet subnet show --resource-group $VNET_RG --name $SUBNETNAME --vnet-name $VNET --query="id" -o tsv)
After setting up the variables, it’s time to create resource group for cluster resources.
az group create --name $RESOURCEGROUP --location $LOCATION
Once the resource group is ready, we can go ahead and create cluster virtual machines (master1, node1 and node2).
az vm create --name master1 --resource-group $RESOURCEGROUP --location $LOCATION --admin-username $ADMINUSER --size $VM_SIZE --image UbuntuLTS --subnet $SUBNETID --public-ip-address "" --nsg "" --ssh-key-values ./id_rsa.pub --custom-data ./init-master.sh --no-wait
az vm create --name node1 --resource-group $RESOURCEGROUP --location $LOCATION --admin-username $ADMINUSER --size $VM_SIZE --image UbuntuLTS --subnet $SUBNETID --public-ip-address "" --nsg "" --ssh-key-values ./id_rsa.pub --custom-data ./init-node.sh --no-wait
az vm create --name node2 --resource-group $RESOURCEGROUP --location $LOCATION --admin-username $ADMINUSER --size $VM_SIZE --image UbuntuLTS --subnet $SUBNETID --public-ip-address "" --nsg "" --ssh-key-values ./id_rsa.pub --custom-data ./init-node.sh --no-wait
I’ll quickly walkthrough az vm create command for master1 VM. I’m defining name (--name), resource group (--resource-group) and location (--location) for the vm resources. I also define the size (--size) of the vm and that I want to use (--image) UbuntuLTS for OS. I’m also passing the resourceid of the subnet (--subnet) I want this vm to attach. I don’t want Azure to provision a public ip (--public-ip-address "") or NSG (--nsg "") for the vm. Then I’m passing my SSH public key file (--ssh-key-values) and path to a bash script file (--custom-data) that I want to run after the vm is provisioned. Lastly I’m passing --no-wait as I don’t want to wait until the first vm is provisioned and the proceed to the second vm and so on. I want VMs to be provisioned at the same time. Note There are separate scripts for master and the nodes. Let’s see what those scripts do.
Automating the boring stuff aka initialization scripts
The reason I’m using the scripts is simple. I don’t want to login to each of the virtual machines and configure needed bits and pieces every time I need a short living Kubernetes cluster. And yes, it’s also boring after first few times. I could have also used cloud-init to configure cluster’s virtual machines, but I already had most parts of the bash scripts available, so I chose to stick with them.
I’ll walk through the content of the bash script used for initializing master. As you probably know Kubernetes needs a container runtime to run containers in pods. I have decided to use docker for that purpose. After installing docker, I’m configuring docker to use systemd as cgroup driver to have one cgroup manager. You can read more about the benefits for that from Kubernetes docs. Docker needs to be restarted after the change. I’ll also make sure docker service starts on boot.
Note There’s no need to run the commands with sudo as the initialization script is run by root account. In case you are running the commands manually, you might need to sudo them. You can also find sudo-versions of the scripts from my GitHub repo.
apt-get update && apt-get install -y docker.io

cat <<EOF | tee /etc/docker/daemon.json
{
  "exec-opts": ["native.cgroupdriver=systemd"],
  "log-driver": "json-file",
  "log-opts": {
    "max-size": "100m"
  },
  "storage-driver": "overlay2"
}
EOF

mkdir -p /etc/systemd/system/docker.service.d
systemctl daemon-reload
systemctl restart docker
systemctl enable docker
Then we can go ahead and make sure node’s iptables can see bridged traffic.
cat <<EOF | tee /etc/sysctl.d/k8s.conf
net.bridge.bridge-nf-call-ip6tables = 1
net.bridge.bridge-nf-call-iptables = 1
EOF
sysctl –system
To be able to install necessary tools, we first need to add Kubernetes repo. Then we can proceed and install kubelet, kubeadm and kubectl.
apt-get update && apt-get install -y apt-transport-https curl
curl -s https://packages.cloud.google.com/apt/doc/apt-key.gpg | apt-key add -

cat <<EOF | tee /etc/apt/sources.list.d/kubernetes.list
deb https://apt.kubernetes.io/ kubernetes-xenial main
EOF

apt-get update && apt-get install -y kubelet kubeadm kubectl
We will also want to mark these packages as held back, which will prevent them from being automatically installed, upgraded or removed. Finally we’ll reload daemon and restart kubelet.
apt-mark hold kubelet kubeadm kubectl
systemctl daemon-reload
systemctl restart kubelet
After the pieces are in place, we can initialize the cluster by running kubeadm init. I have decided to use flannel as the network addon, thus I need to pass --pod-network-cidr 10.244.0.0/16 for kubedam init. There are several alternative network add-ons available and you can find them listed on Kubernetes docs.
kubeadm init --pod-network-cidr 10.244.0.0/16
After the cluster is initialized, we’ll copy kubeconfig file to our non-root user account, so that we are able to use kubectl to talk to the cluster. Note that we need to use our admin username here, as this script is not executed in context of our admin user.
mkdir -p /home/azureuser/.kube
cp -i /etc/kubernetes/admin.conf /home/azureuser/.kube/config
chown -R azureuser:azureuser /home/azureuser/.kube
Finally, we can setup container network by deploying flannel. Note that we need to pass –kubeconfig and config file for the command.
kubectl --kubeconfig /home/azureuser/.kube/config apply -f https://raw.githubusercontent.com/coreos/flannel/master/Documentation/kube-flannel.yml
Only difference between the init-master.sh and init-node.sh script files is that node-script does not have the last three steps: kubeadm init, copying kubeconfig and deploying flannel.
Joining nodes to cluster
You have probably noticed that the nodes are not automatically joined to the cluster. Certainly, it can be done, but I decided that I’m doing it manually. It gives me a possibility to check that the VMs are in healthy state overall.
To join nodes to the cluster, a token is needed. If we would have manually executed kubeadm init on the master, we would have been presented the necessary information. We could go on and fetch that token and the value of Discovery Token CA Cert Hash, but I have found it easier to create a new token with --print-join-command option to get the whole kubeadm join command with all necessary information (token, control-plane and hash).
Using my jumpbox, I can SSH into the master with my private key (which I already have in my jumpbox) and create the new token.
ssh azureuser@ip-address-of-master
kubeadm token create --print-join-command
All there is left to do, is to run the kubeadm join command which is outputted on both nodes. It takes some time (usually it’s just a matter of few seconds) for nodes to register themselves to the master. You can confirm they’re registered by running kubectl get node command on the master.
Kubernetes playground is now ready to play with.
Removing resources
After I’m done playing with the cluster, it’s just a matter of removing the resource group to avoid unnecessary costs.
az group delete --name rg-kubernetes-test --yes --no-wait
Summary and what’s next
In this blog post I have introduced how I have set up my Kubernetes playground in Azure for my Kubernetes studies. I hope this post helps you with setting up a playground for you as well.
I have not yet decided which topics, and in which order I will be writing stuff, but most probably I’ll start with core concepts (pods, controllers, services and so on) and then work from there to other topics. If you’re interested in Kubernetes or AKS, please follow this blog for more content. If you have any questions, comments or if I missed something, feel free to contact me via LinkedIn or Twitter.
Until next time.